by Megan from The Sun House Blog
On a very, very hot day in October, 2013, the love of my life and I tied the knot at the lovely Hertford Country Hotel in Lanseria. It was beyond perfect! And if anything actually went wrong on the day, I didn’t know about it. There was the fact that we forgot about the father/daughter dance, and my dad forgot to shake my then-fiance’s hand when he handed me over. But, it was entirely our day and about 90% of the wedding was a do-it-yourself project. Including the table numbers. {see the wedding pics here}
Our wedding might have been almost three months ago, but I still have so much to share. And with all the time and effort my dear mother put into all the little details, it would just not be fair to her to not share her amazing handy work. We did almost everything décor related by ourselves – and it was hard work! I helped where I can and documented when I was there. Luckily, I could help over weekends and was there for the table number making process.
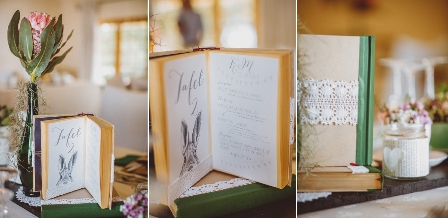
Firstly, you need to dive into your local Hospice or Thrift shop and find some sturdy, old – but still decent, books. My mom’s church has a little library from which it sells books. There were boxes full. My dad and I delved into a box one afternoon and found these sturdy Reader’s Digest compilations. You don’t have to choose books that are all the same size, but it does make it more uniform and easier when it comes to the wrapping part, as you can cut a template and go from there.
To ensure that the books can stand open and, to have a space to put your table numbers and menu, you need to stick all the pages together – with the exception of two pages in the middle. We used ponal glue.
After procuring your books, you would need to wrap them. My mom and I had a funny system, where we cut out two sizes from the paper and stuck them on. I think we didn’t wrap the book as the paper was too thick and it would have made wrapping a little more difficult. We used double sided sticky tape to do the job.
After all the cutting, taping and sticking, we lined the back of the books with green librarians’ tape, but you can use coloured duct tape, it works just as well. This was just to round the books off. But, before we did this, we measured and cut our lace pieces. On half the books, we used the lace horizontally, while on the other half, we stuck them vertically. I couldn’t decide which one looked better and even asked the ladies on instagram whether I should go with the horizontal or vertical look. They all chose the one I wasn’t too fond of, so I went half/half.
Once all the sticking is done, you can print out your table number and menu to stick on the inside, where you left two pages open. And now you can relax.
My mom and I enjoyed looking at our hard work over a cup of tea!
Wedding image pics: Kikitography
Be sure to follow Megan on her blog, Facebook or Twitter.
Let's get social
Instagram: @lovilee_zaTwitter: @lovilee_za
Facebook: @lovileeblog
or subscribe to never miss out on any new articles in this link.


Comments are closed.